Loading Code in Ruby, Part 1: The require method and friends

I recently read Chad Fowler’s The Passionate Programmer, and he mentions the importance of reading other peoples’ code. This reminded me of something I’ve kind of had in mind for a while, which is to do a deep dive into some parts of the Ruby on Rails code base, in order to better understand how certain things work. The first thing I’d like to explore is the startup process, and the first part of understanding that is learning how it loads all of the relevant pieces of code before things start.

For the first part of this exploration, I’m going to look at Ruby’s lowest level primitives for loading code (i.e. the require method and related methods). In the second part, I’ll take a look at how RubyGems works and in the third part, I plan to tackle how bundler comes into play.

The require method

So to start off, looking at the documentation for the require method on ruby-doc.org, a few of the details are explained. When the require method is called, the following happens:

  • If an explicit path to a file was specified (i.e. absolute path or path starting with dot), it will be loaded.
  • If a path is not specified, the directories contained in the variable $: or $LOAD_PATH (both refer to the same array) are searched for the file requested.
  • Various extensions are added to the name requested (.rb, .so, .o, .dll, etc.)
  • If the file is successfully loaded, the full path will be added to the $" or $LOADED_FEATURES array.
  • The file will only be loaded once, so it is safe to call require as many times as you want.

In a modern version of ruby, RubyGems will be loaded at startup, and it will augment the logic to the require method, so things get a lot more complicated. We will be looking at RubyGems in part 2, but we want to ignore it for now. For demonstration purposes, we’ll disable RubyGems and poke around a bit.

$ RUBYOPT="--disable-gems" irb

This will cause the underlying ruby to use the --disable-gems option when IRB is started, so we can access the primitive built-in require method without the RubyGems functionality. The first thing we can explore is the default load paths:

2.1.2 :003 > puts $:.join("\n")
/Users/alwold/.rvm/rubies/ruby-2.1.2/lib/ruby/site_ruby/2.1.0
/Users/alwold/.rvm/rubies/ruby-2.1.2/lib/ruby/site_ruby/2.1.0/x86_64-darwin13.0
/Users/alwold/.rvm/rubies/ruby-2.1.2/lib/ruby/site_ruby
/Users/alwold/.rvm/rubies/ruby-2.1.2/lib/ruby/vendor_ruby/2.1.0
/Users/alwold/.rvm/rubies/ruby-2.1.2/lib/ruby/vendor_ruby/2.1.0/x86_64-darwin13.0
/Users/alwold/.rvm/rubies/ruby-2.1.2/lib/ruby/vendor_ruby
/Users/alwold/.rvm/rubies/ruby-2.1.2/lib/ruby/2.1.0
/Users/alwold/.rvm/rubies/ruby-2.1.2/lib/ruby/2.1.0/x86_64-darwin13.0
 => nil

Remember, $: or $LOAD_PATH is the list of directories that are searched when require is called. This shows the current list of paths with our fresh IRB console. So, for example, if you type require 'foo', ruby will search each of those directories for a foo.rb, foo.so, etc.

The load path can be altered in a few ways, including the -I option to ruby:

$ ruby -I /foo/bar -e 'print $:.join("\n")'
/foo/bar
/Users/alwold/.rvm/rubies/ruby-2.0.0-p353/lib/ruby/site_ruby/2.0.0
/Users/alwold/.rvm/rubies/ruby-2.0.0-p353/lib/ruby/site_ruby/2.0.0/x86_64-darwin12.5.0
/Users/alwold/.rvm/rubies/ruby-2.0.0-p353/lib/ruby/site_ruby
/Users/alwold/.rvm/rubies/ruby-2.0.0-p353/lib/ruby/vendor_ruby/2.0.0
/Users/alwold/.rvm/rubies/ruby-2.0.0-p353/lib/ruby/vendor_ruby/2.0.0/x86_64-darwin12.5.0
/Users/alwold/.rvm/rubies/ruby-2.0.0-p353/lib/ruby/vendor_ruby
/Users/alwold/.rvm/rubies/ruby-2.0.0-p353/lib/ruby/2.0.0
/Users/alwold/.rvm/rubies/ruby-2.0.0-p353/lib/ruby/2.0.0/x86_64-darwin12.5.0

…or the RUBYLIB variable:

$ RUBYLIB=/foo ruby -e 'print $:.join("\n")'
/foo
/Users/alwold/.rvm/rubies/ruby-2.0.0-p353/lib/ruby/site_ruby/2.0.0
/Users/alwold/.rvm/rubies/ruby-2.0.0-p353/lib/ruby/site_ruby/2.0.0/x86_64-darwin12.5.0
/Users/alwold/.rvm/rubies/ruby-2.0.0-p353/lib/ruby/site_ruby
/Users/alwold/.rvm/rubies/ruby-2.0.0-p353/lib/ruby/vendor_ruby/2.0.0
/Users/alwold/.rvm/rubies/ruby-2.0.0-p353/lib/ruby/vendor_ruby/2.0.0/x86_64-darwin12.5.0
/Users/alwold/.rvm/rubies/ruby-2.0.0-p353/lib/ruby/vendor_ruby
/Users/alwold/.rvm/rubies/ruby-2.0.0-p353/lib/ruby/2.0.0
/Users/alwold/.rvm/rubies/ruby-2.0.0-p353/lib/ruby/2.0.0/x86_64-darwin12.5.0

Now, let’s see what’s currently loaded:

2.1.2 :004 > puts $".join("\n")
enumerator.so
enc/encdb.so
enc/trans/transdb.so
/Users/alwold/.rvm/rubies/ruby-2.1.2/lib/ruby/2.1.0/e2mmap.rb
/Users/alwold/.rvm/rubies/ruby-2.1.2/lib/ruby/2.1.0/irb/init.rb
/Users/alwold/.rvm/rubies/ruby-2.1.2/lib/ruby/2.1.0/irb/workspace.rb
/Users/alwold/.rvm/rubies/ruby-2.1.2/lib/ruby/2.1.0/irb/inspector.rb
/Users/alwold/.rvm/rubies/ruby-2.1.2/lib/ruby/2.1.0/irb/context.rb
/Users/alwold/.rvm/rubies/ruby-2.1.2/lib/ruby/2.1.0/irb/extend-command.rb
/Users/alwold/.rvm/rubies/ruby-2.1.2/lib/ruby/2.1.0/irb/output-method.rb
/Users/alwold/.rvm/rubies/ruby-2.1.2/lib/ruby/2.1.0/irb/notifier.rb
/Users/alwold/.rvm/rubies/ruby-2.1.2/lib/ruby/2.1.0/irb/slex.rb
/Users/alwold/.rvm/rubies/ruby-2.1.2/lib/ruby/2.1.0/irb/ruby-token.rb
/Users/alwold/.rvm/rubies/ruby-2.1.2/lib/ruby/2.1.0/irb/ruby-lex.rb
/Users/alwold/.rvm/rubies/ruby-2.1.2/lib/ruby/2.1.0/irb/src_encoding.rb
/Users/alwold/.rvm/rubies/ruby-2.1.2/lib/ruby/2.1.0/irb/magic-file.rb
readline.so
/Users/alwold/.rvm/rubies/ruby-2.1.2/lib/ruby/2.1.0/irb/input-method.rb
/Users/alwold/.rvm/rubies/ruby-2.1.2/lib/ruby/2.1.0/irb/locale.rb
/Users/alwold/.rvm/rubies/ruby-2.1.2/lib/ruby/2.1.0/irb.rb
/Users/alwold/.rvm/rubies/ruby-2.1.2/lib/ruby/2.1.0/irb/completion.rb
/Users/alwold/.rvm/scripts/irbrc.rb
 => nil

As mentioned before, the $" or $LOADED_FEATURES variable shows the list of files that have already been loaded in the current instance of ruby. We have a few .so native shared library files loaded, as well as a bunch of ruby files for IRB. The IRB-related files are loaded by the irb script (it calls require 'irb'), so they wouldn’t be there in a plain ruby instance without IRB running:

$ ruby --disable-gems -e 'puts $".join("\n")'
enumerator.so
enc/encdb.so
enc/trans/transdb.so

So, you can see there are just a few files loaded at startup with a plain ruby.

Now, lets’s see what happens if we load another library from the standard ruby library (we don’t have RubyGems loaded, so we can’t load gems right now).

2.1.2 :005 > original = $".dup
 => ["enumerator.so", "enc/encdb.so", "enc/trans/transdb.so", "/Users/alwold/.rvm/rubies/ruby-2.1.2/lib/ruby/2.1.0/e2mmap.rb", "/Users/alwold/.rvm/rubies/ruby-2.1.2/lib/ruby/2.1.0/irb/init.rb", "/Users/alwold/.rvm/rubies/ruby-2.1.2/lib/ruby/2.1.0/irb/workspace.rb", "/Users/alwold/.rvm/rubies/ruby-2.1.2/lib/ruby/2.1.0/irb/inspector.rb", "/Users/alwold/.rvm/rubies/ruby-2.1.2/lib/ruby/2.1.0/irb/context.rb", "/Users/alwold/.rvm/rubies/ruby-2.1.2/lib/ruby/2.1.0/irb/extend-command.rb", "/Users/alwold/.rvm/rubies/ruby-2.1.2/lib/ruby/2.1.0/irb/output-method.rb", "/Users/alwold/.rvm/rubies/ruby-2.1.2/lib/ruby/2.1.0/irb/notifier.rb", "/Users/alwold/.rvm/rubies/ruby-2.1.2/lib/ruby/2.1.0/irb/slex.rb", "/Users/alwold/.rvm/rubies/ruby-2.1.2/lib/ruby/2.1.0/irb/ruby-token.rb", "/Users/alwold/.rvm/rubies/ruby-2.1.2/lib/ruby/2.1.0/irb/ruby-lex.rb", "/Users/alwold/.rvm/rubies/ruby-2.1.2/lib/ruby/2.1.0/irb/src_encoding.rb", "/Users/alwold/.rvm/rubies/ruby-2.1.2/lib/ruby/2.1.0/irb/magic-file.rb", "readline.so", "/Users/alwold/.rvm/rubies/ruby-2.1.2/lib/ruby/2.1.0/irb/input-method.rb", "/Users/alwold/.rvm/rubies/ruby-2.1.2/lib/ruby/2.1.0/irb/locale.rb", "/Users/alwold/.rvm/rubies/ruby-2.1.2/lib/ruby/2.1.0/irb.rb", "/Users/alwold/.rvm/rubies/ruby-2.1.2/lib/ruby/2.1.0/irb/completion.rb", "/Users/alwold/.rvm/scripts/irbrc.rb"]
2.1.2 :006 > require 'net/http'
 => true
2.1.2 :011 > puts ($" - original).join("\n")
socket.so
/Users/alwold/.rvm/rubies/ruby-2.1.2/lib/ruby/2.1.0/socket.rb
/Users/alwold/.rvm/rubies/ruby-2.1.2/lib/ruby/2.1.0/timeout.rb
/Users/alwold/.rvm/rubies/ruby-2.1.2/lib/ruby/2.1.0/net/protocol.rb
/Users/alwold/.rvm/rubies/ruby-2.1.2/lib/ruby/2.1.0/uri/common.rb
/Users/alwold/.rvm/rubies/ruby-2.1.2/lib/ruby/2.1.0/uri/generic.rb
/Users/alwold/.rvm/rubies/ruby-2.1.2/lib/ruby/2.1.0/uri/ftp.rb
/Users/alwold/.rvm/rubies/ruby-2.1.2/lib/ruby/2.1.0/uri/http.rb
/Users/alwold/.rvm/rubies/ruby-2.1.2/lib/ruby/2.1.0/uri/https.rb
/Users/alwold/.rvm/rubies/ruby-2.1.2/lib/ruby/2.1.0/uri/ldap.rb
/Users/alwold/.rvm/rubies/ruby-2.1.2/lib/ruby/2.1.0/uri/ldaps.rb
/Users/alwold/.rvm/rubies/ruby-2.1.2/lib/ruby/2.1.0/uri/mailto.rb
/Users/alwold/.rvm/rubies/ruby-2.1.2/lib/ruby/2.1.0/uri.rb
zlib.so
stringio.so
/Users/alwold/.rvm/rubies/ruby-2.1.2/lib/ruby/2.1.0/net/http/exceptions.rb
/Users/alwold/.rvm/rubies/ruby-2.1.2/lib/ruby/2.1.0/net/http/header.rb
/Users/alwold/.rvm/rubies/ruby-2.1.2/lib/ruby/2.1.0/net/http/generic_request.rb
/Users/alwold/.rvm/rubies/ruby-2.1.2/lib/ruby/2.1.0/net/http/request.rb
/Users/alwold/.rvm/rubies/ruby-2.1.2/lib/ruby/2.1.0/net/http/requests.rb
/Users/alwold/.rvm/rubies/ruby-2.1.2/lib/ruby/2.1.0/net/http/response.rb
/Users/alwold/.rvm/rubies/ruby-2.1.2/lib/ruby/2.1.0/net/http/responses.rb
/Users/alwold/.rvm/rubies/ruby-2.1.2/lib/ruby/2.1.0/net/http/proxy_delta.rb
/Users/alwold/.rvm/rubies/ruby-2.1.2/lib/ruby/2.1.0/net/http/backward.rb
/Users/alwold/.rvm/rubies/ruby-2.1.2/lib/ruby/2.1.0/net/http.rb
 => nil 

Here, we create a copy of the original value of $", then we can then check what was added to it after calling require 'net/http'. When calling require 'net/http', ruby looks through its load paths, which includes /Users/alwold/.rvm/rubies/ruby-2.1.2/lib/ruby/2.1.0 (which we saw earlier) then it looks for net/http with various extensions, finding /Users/alwold/.rvm/rubies/ruby-2.1.2/lib/ruby/2.1.0/net/http.rb. That file then requires various other files, some of which require other files and so on, resulting in the eventual loading of all of the files we see in the previous output.

Each file that is loaded is evaluated by the interpreter, defining methods, classes, modules, etc. and executing code at the top level. In our case, this results in the Net::HTTP class (and lots of other stuff) being defined, at which point we can call its methods and make HTTP connections.

require_relative, load and autoload

Another method of interest is the require_relative method. require_relative is similar to require, except that it loads a file using a path relative to the script that contains the call to require_relative. So, for example, if you call require_relative 'bla' from within the file /foo/bar/baz.rb, the file /foo/bar/bla.rb is loaded. This is useful when you have a set of files, where you want to require to one file from another. With the normal require method, relative paths use the current directory as the starting point, and the current directory can be pretty unpredictable. With this in mind, it’s nice to be able to refer to a file relative to the path of the calling file.

Other methods of interest are the load and autoload methods. The load method is similar to require, except that it will always load the file, even if it has already been loaded. autoload can be used to trigger automatic loading of a file when particular constants are referenced. One thing to note is that only the require method is subject to the RubyGems magic I mentioned earlier.

The load and autoload methods are less commonly used, so I didn’t go too deep into detail on them, but if you want to learn more, this article does a good job explaining in more detail:

https://practicingruby.com/articles/ways-to-load-code

The require method is pretty simple, but it’s the basic building block for most of the code loading mechanisms in ruby. I think knowing the details of how it works will be helpful in understanding the way RubyGems and bundler work in further explorations. It should also be helpful in diagnosing any future issues with code loading.

CorePlot, NSDecimal and Swift

Recently, I shared a post that demonstrated how to integrate CorePlot into your Swift-based iOS project. That post covered the basics of how to get started, but there’s an issue with using CorePlot which can cause problems pretty quickly once you get into building your graphs.

CorePlot makes heavy use of the NSDecimal type in Objective-C, which is a special C struct used to store decimal numbers. Swift doesn’t directly support NSDecimal, so any methods that use it in CorePlot APIs are simply missing when you try to access them from Swift.

If you haven’t checked out the previous post, you’ll want to do that first. Starting from that app, we’ll replace all of the graph drawing code with some new code to build a scatter plot. We’ll just have some mock data, with four records, each with the x and y values set to the same number (1 through 4):


//
// ViewController.swift
// CorePlotTest
//
// Created by Al Wold on 8/6/14.
// Copyright (c) 2014 Al Wold. All rights reserved.
//
import UIKit
class ViewController: UIViewController, CPTPlotDataSource {
@IBOutlet weak var graphView: CPTGraphHostingView!
override func viewDidLoad() {
super.viewDidLoad()
// create graph
var graph = CPTXYGraph(frame: CGRectZero)
graph.title = "Hello Graph"
var plot = CPTScatterPlot()
plot.dataSource = self
graph.addPlot(plot)
self.graphView.hostedGraph = graph
}
func numberOfRecordsForPlot(plot: CPTPlot!) -> UInt {
return 4
}
func numberForPlot(plot: CPTPlot!, field fieldEnum: UInt, recordIndex idx: UInt) -> NSNumber! {
return idx+1
}
override func didReceiveMemoryWarning() {
super.didReceiveMemoryWarning()
// Dispose of any resources that can be recreated.
}
}

You should get something like this:

Screenshot 2014-08-29 18.04.01

As you can see, there’s nothing there. This is because the range on our plot isn’t big enough to show the graph. We need to set the length values for the x and y ranges on the default plot space. Our approach will be like this:

  • Get the default plot space for the graph
  • Get the x range of the plot space
  • Create a mutable copy of the x range
  • Set the x range’s length
  • Set the x range on the plot space to our new mutable copy
  • Repeat for the y range

Everything goes fine until you try to set the length of the x range. The length property on the CPTMutablePlotRange is represented as an NSDecimal, so it isn’t bridged into Swift.

Luckily, there’s a pretty easy workaround. By adding a Category for the classes you are using, you can add wrapper methods which use a supported Swift data type. In our case, we’ll be wrapping the CPTMutablePlotRange object in CorePlot, so that we can set the area displayed by our graph.

  • In XCode, select File->New->File
  • Select iOS->Source->Objective-C File
  • For the File Type, select Category, then fill it in like this:


Screenshot 2014-09-02 15.25.21


This will create a file called CPTMutablePlotRange+SwiftCompat.h/m. All of the methods we add in the category will be accessible each time we encounter a CPTMutablePlotRange in our app. We’ll just add a method to set the length as a float instead of an NSDecimal:


//
// CPTMutablePlotRange+SwiftCompat.h
// CorePlotTest
//
// Created by Al Wold on 8/29/14.
// Copyright (c) 2014 Al Wold. All rights reserved.
//
#import <UIKit/UIKit.h>
#import "CPTMutablePlotRange.h"
@interface CPTMutablePlotRange (SwiftCompat)
– (void)setLengthFloat:(float)lengthFloat;
@end


//
// CPTMutablePlotRange+SwiftCompat.m
// CorePlotTest
//
// Created by Al Wold on 8/29/14.
// Copyright (c) 2014 Al Wold. All rights reserved.
//
#import "CPTMutablePlotRange+SwiftCompat.h"
@implementation CPTMutablePlotRange (SwiftCompat)
– (void)setLengthFloat:(float)lengthFloat
{
NSNumber *number = [NSNumber numberWithFloat:lengthFloat];
[self setLength:[number decimalValue]];
}
@end

The last step is to make sure to import CPTMutablePlotRange+SwiftCompat.h in your bridging header (see the previous post for how to set up your bridging header). Once you do that, you should be able to access the new setLengthFloat method any time you encounter a CPTMutablePlotRange.

So, let’s add some more code to the ViewController.swift to set the lengths:


var plotSpace = graph.defaultPlotSpace as CPTXYPlotSpace
var xRange = plotSpace.xRange.mutableCopy() as CPTMutablePlotRange
var yRange = plotSpace.yRange.mutableCopy() as CPTMutablePlotRange
xRange.setLengthFloat(10)
yRange.setLengthFloat(10)
plotSpace.xRange = xRange
plotSpace.yRange = yRange

view raw

gistfile1.swift

hosted with ❤ by GitHub

Once this is added, we run the app and get a graph that looks like this:

Screenshot 2014-08-29 18.07.58

Cool. It’s not very pretty, but it’s showing all of our data now. As you come across other methods/properties that need an NSDecimal, you can create/add to your categories to wrap the functions.

Eventually, I imagine this will be solved either via Swift adding a way to deal with NSDecimal types, or by CorePlot switching to another data type, but for now it’ll get you by. There’s some discussion on the CorePlot github, which you may want to keep an eye on:

https://github.com/core-plot/core-plot/issues/96

The full code for this is available in the sample app for the previous post, under the nsdecimal-workaround branch here:

https://github.com/alwold/CorePlotTest/tree/nsdecimal-workaround

Using CorePlot with Swift in iOS

Apple_Swift_LogoI just started working on a new iOS app right after the Swift announcement, and decided to try writing it in Swift. I needed to add some graphs to the app, and after looking at the options, I decided to give CorePlot a try. I wasn’t sure how things would work out with CocoaPods and a third party Objective-C library from a Swift app, but I was able to build something that works pretty well, so I’m going to outline how to do this with a quick sample app.

If you want to go straight to the code, my sample app is available on GitHub.

  1. The first step is to create your swift app. For our sample, we’re going to do a single view app, so create that in XCode, and set the default language to Swift
  2. Next, we’ll add CocoaPods as usual. Check out their site for more info how to install it, etc. But, once you have CocoaPods, go into your project dir and run:
    $ pod init
  3. This will give you a basic Podfile, which you’ll want to edit, to add the following line:
    pod 'CorePlot'
  4. Once you’ve added CorePlot to the Podfile, you can install CorePlot by running:
    pod install
  5. Now, you have to close the project in XCode and open up the newly created workspace for your project. The workspace file has a .xcworkspace extension, and should be in your project directory. Opening the workspace will give you access to your original project, plus all of the CocoaPods you’ve installed in the project.
  6. At this point, if you were writing an Objective C app, you’d be able to start adding CorePlot functionality to your app, but we need to do few things to get it working in Swift.
  7. Create a new header file in XCode, by going to File->New->File…, and select Header File (under iOS->Source). Call your header file <app>-Bridging-Header.h, where <app> is your app’s name. You can read more about bridging headers on Apple’s guide on interoperability.
  8. Add CorePlot to the header file, by adding this line:
    #import "CorePlot-CocoaTouch.h"
  9. Now, you have to tell XCode about the bridging header.
    • Click on the project in the Project navigator
    • Under the Targets heading in the left sidebar, make sure you click on your project’s name
    • Make sure the “All” view is enabled (as opposed to “Basic”)
    • Scroll way down to the “Swift Compiler – Code Generation” section toward the bottom
    • Under Objective-C Bridging Header, enter the name of your bridging header (e.g. <appname>/<appname>-Bridging-Header.h)
    • This should enable access to CorePlot from Swift, let’s try it out.
      Screenshot 2014-08-07 00.34.55
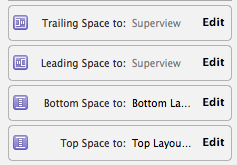
  10. Go into your storyboard and add a plain View object to your view controller. This view will be a placeholder for the graph we’re going to create. You should add proper layout constraints to make sure the view fills the whole screen without going off the screen. Here’s what mine look like (they are all set to zero):
    Screenshot 2014-08-07 00.42.41
  11. Set the view object to have a custom class, and set it to CPTGraphHostingView

    Screenshot 2014-08-07 00.33.37
  12. Create an outlet for the view in your view controller. Call it graphView.
  13. Add the following code to the viewDidLoad method of your ViewController class to create a simple pie chart:
    // create graph
    var graph = CPTXYGraph(frame: CGRectZero)
    graph.title = "Hello Graph"
    graph.paddingLeft = 0
    graph.paddingTop = 0
    graph.paddingRight = 0
    graph.paddingBottom = 0
    // hide the axes
    var axes = graph.axisSet as CPTXYAxisSet
    var lineStyle = CPTMutableLineStyle()
    lineStyle.lineWidth = 0
    axes.xAxis.axisLineStyle = lineStyle
    axes.yAxis.axisLineStyle = lineStyle
    // add a pie plot
    var pie = CPTPieChart()
    pie.dataSource = self
    pie.pieRadius = (self.view.frame.size.width * 0.9)/2
    graph.addPlot(pie)
    self.graphView.hostedGraph = graph
    view raw graph.swift hosted with ❤ by GitHub
  14. Add the CPTPlotDataSource protocol to the list of protocols that your ViewController implements. It should look something like this:
    class ViewController: UIViewController, CPTPlotDataSource {
  15. Add the CPTPlotDataSource methods. The samples below will create four sections in the pie graph, and the size of each section will be equal to its position plus one (i.e. 1, 2, 3, 4), so we’ll get a graph with some variety.
    func numberOfRecordsForPlot(plot: CPTPlot!) -> UInt {
    return 4
    }
    func numberForPlot(plot: CPTPlot!, field fieldEnum: UInt, recordIndex idx: UInt) -> NSNumber! {
    return idx+1
    }
    view raw data.swift hosted with ❤ by GitHub
  16. At this point, you should be able to run your app, and get a properly generated graph:
    Screenshot 2014-08-07 00.45.03

The code for my sample app can be found on GitHub here:

https://github.com/alwold/CorePlotTest

This shows the very basics of how to get up and running. There are some further caveats, especially with calling methods that involve parameters of the NSDecimal type. My solution for that was to add some Objective-C wrapper code. Hopefully, I can show how to do that in a future post.

Update: I have a new post describing how to deal with APIs that use NSDecimal here.

Styling tabs in the Android action bar

I’m currently in the process of putting the finishing touches on the Android version of Find My Train. Since design detail is a major focus in the app, I’m delving deeper into some of the UI elements than might be done on a typical app. My most recent change was to tweak the color of the tabs on the action bar to match the color scheme of the app. This turned out to be surprisingly tricky, so I’m documenting it here. The default color looked like this:

2013-08-27 11.37.22As you can see, the little indicator of the active tab is a blue color that doesn’t really go along with the rest of the app. So, looking into this, there’s a bit of info in the official android docs here:

http://developer.android.com/guide/topics/ui/actionbar.html#Style

However, it doesn’t go into much detail about how to actually style the tabs. I wandered through a lot of stack overflow questions about it, but wasn’t very satisfied with any of the answers I saw. I also found this site which generates tab bar styles automatically for you:

http://jgilfelt.github.io/android-actionbarstylegenerator/

I tried it out, and it generated a huge number of resource files, plus it was using images for the solid color parts, so I wasn’t very happy with it.

Finally, I checked out some of the sample code for ActionBarSherlock here:

https://github.com/JakeWharton/ActionBarSherlock/tree/master/actionbarsherlock-samples/styled

This gave me an idea of how the style needed to be structured, but seemed incomplete (I couldn’t find some of the referenced drawables, like “ad_tab_unselected_holo”). Between the two examples, I was eventually able to figure things out and build a working solution.

How Action Bar tabs are styled

To control the style on the tabs, you’ll need to do the following:

  1. Create a custom theme for your app, which you’ll probably want to put in styles.xml, and reference your tab styles for each part you want to customize
  2. Create styles for each part of the tabs
  3. Set your app to use the custom theme via AndroidManifest.xml

There are several parts of the tabs that you can customize, and the official documentation seems a little misleading on what they do, so I’ll rephrase here:

  • actionBarTabStyle – This determines the style of the tabs themselves. The tab is the area that includes the text, its background, and the little indicator bar under the text. If you want to customize the indicator like I did, you need to alter this one.
  • actionBarTabBarStyle – This determines the style of the overall tab bar. It includes the whole container that includes all of the tabs.
  • actionBarTabTextStyle – this one I didn’t use, so I’ll assume the official docs explain it properly.

To give you a better idea of how the actionBarTabStyle and actionBarTabBarStyle work, I’ve included a screenshot below, where the actionBarTabStyle has the background set to red, and the actionBarTabBarStyle has the background set to blue. You can see how the blue background covers the whole tab bar area, and the red backgrounds cover each tab.

2013-08-27 20.16.46

Changing the indicator color

My main goal was to change the indicator color under the active tab, but I also wanted to change the highlight color that shows up when the user clicks the tab. Here’s how I ended up doing it:

  1. Create the theme for the app, the action bar, and the tabs. We need to set the background for the tabs to the “tab_bar_background” drawable.

    <style name="FindMyTrain" parent="Theme.Sherlock">
    <item name="android:actionBarTabStyle">@style/FindMyTrain.ActionBar.Tab</item>
    <item name="actionBarTabStyle">@style/FindMyTrain.ActionBar.Tab</item>
    </style>
    <style name="FindMyTrain.ActionBar.Tab">
    <item name="android:background">@drawable/tab_bar_background</item>
    </style>
    view raw styles.xml hosted with ❤ by GitHub
  2. Next, create the tab_bar_background drawable. This will be a state list drawable, which has different visual appearance depending on whether the tab is selected and/or pressed. In the state list, we’ll reference two other drawables for when the button is selected, and we’ll just use a plain color for the unselected states:
    <?xml version="1.0" encoding="utf-8"?>
    <selector xmlns:android="http://schemas.android.com/apk/res/android"&gt;
    <item android:state_focused="false" android:state_selected="false" android:state_pressed="false" android:drawable="@color/transparent"/>
    <item android:state_focused="false" android:state_selected="true" android:state_pressed="false" android:drawable="@drawable/tab_bar_background_selected"/>
    <item android:state_selected="false" android:state_pressed="true" android:drawable="@color/tab_highlight"/>
    <item android:state_selected="true" android:state_pressed="true" android:drawable="@drawable/tab_bar_background_selected_pressed"/>
    </selector>
  3. We’ll also need to create a colors.xml file to define the two colors we used in the state list drawable:
    <?xml version="1.0" encoding="utf-8"?>
    <resources>
    <color name="transparent">#00000000</color>
    <color name="tab_highlight">#ff9ecfbf</color>
    </resources>
    view raw colors.xml hosted with ❤ by GitHub
  4. Now, we need to create the drawables for the different backgrounds. The indicator under the active tab comes from the background drawable, so in our custom version, we’ll include an indicator in the proper color. To do this, I used a hack where I create a layer list with a rectangle shape with a 5dp stroke around the exterior, then offset the rectangle so that the top, left and right sides are outside the bounds of the view, so you only see the bottom line. This works pretty well, but if you know a better way to accomplish this, I’d be very interested to hear about it. In the case of the “pressed” version, the fill color is set on the rectangle to indicate that it is pressed.
    <?xml version="1.0" encoding="utf-8"?>
    <layer-list xmlns:android="http://schemas.android.com/apk/res/android"&gt;
    <item android:top="-5dp" android:left="-5dp" android:right="-5dp">
    <shape android:shape="rectangle">
    <stroke android:color="#ff4ba587" android:width="5dp"/>
    </shape>
    </item>
    </layer-list>
    <?xml version="1.0" encoding="utf-8"?>
    <layer-list xmlns:android="http://schemas.android.com/apk/res/android"&gt;
    <item android:top="-5dp" android:left="-5dp" android:right="-5dp">
    <shape android:shape="rectangle">
    <stroke android:color="#ff4ba587" android:width="5dp"/>
    <solid android:color="@color/tab_highlight"/>
    </shape>
    </item>
    </layer-list>
  5. Now our styles and theme are completely set up, so the last step is to apply the theme in AndroidManifest.xml. In my case, I did this by setting the theme on the application element, but you can also set it per-activity instead:
    <application
    android:allowBackup="true"
    android:icon="@drawable/ic_launcher"
    android:label="@string/app_name"
    android:theme="@style/FindMyTrain"
    android:name=".FindMyTrainApplication" >

Once all of this is set up, we run the app and see that the indicator is the right color:

2013-08-27 11.39.33Success!

GPS in an AsyncTask in Android

I recently encountered the need to have an AsyncTask in an Android app that gets the current GPS position, then fetches some data from the network upon getting the position. This isn’t very straightforward to do, since the GPS stuff uses a callback driven model. I did a quick search and came up with a lot of Stack Overflow solutions to the problem that were really bad. Most of them suggested launching a GPS request, then having some sort of loop that spins until the location comes in. At least one of them didn’t even have any sort of delay in the loop, making it burn up your phone’s battery while it waited.

It turns out to be pretty simple to solve this problem, using the Looper class, which is a bit of a confusing thing. The looper will establish a loop which waits for events/messages within the AsyncTask thread. Once the position comes in, you have the code exit the loop, and then continue on with your network request. Here’s the basic idea:


public class AsyncTaskGps extends AsyncTask implements LocationListener {
private Location location;
@Override
protected Object doInBackground(Object… arg0) {
LocationManager lm = (LocationManager) arg0[0];
Looper.prepare();
// Request GPS updates. The third param is the looper to use, which defaults the the one for
// the current thread.
lm.requestSingleUpdate(LocationManager.GPS_PROVIDER, this, null);
Looper.loop(); // start waiting…when this is done, we'll have the location in this.location
try {
// now go use the location to load some data
URL url = new URL("…?latitude="+location.getLatitude()+"&longitude="+location.getLongitude());
URLConnection con = url.openConnection();
InputStream is = con.getInputStream();
byte[] data = new byte[1024];
ByteArrayOutputStream baos = new ByteArrayOutputStream();
int len = -1;
do {
len = is.read(data);
if (len > 0) {
baos.write(data, 0, len);
}
} while (len > -1);
// parse data and do stuff…
} catch (IOException e) {
Log.e("LoadScheduleTask", "Error", e);
} catch (JSONException e) {
Log.e("LoadScheduleTask", "Error", e);
}
return null;
}
@Override
protected void onPostExecute(Object result) {
// notify someone we are done…
}
@Override
public void onLocationChanged(Location location) {
// Store the location, then get the current thread's looper and tell it to
// quit looping so it can continue on doing work with the new location.
this.location = location;
Looper.myLooper().quit();
}
}

Fixing a washing machine

A year or two ago, I had my washing machine stop working and I called someone out, only to have them tell me it wouldn’t be worth it to fix it. I had to pay a $60 or so trip charge, then another bunch of money for a new machine. So, when my girlfriend Kristian told me her washing machine wasn’t working, it seemed like a waste of time to even have someone come out and take a look. We entered the symptoms into google, though, and found a possible fix that was pretty cheap if you do it yourself.

The washer was making grinding noises and wouldn’t spin or agitate, so apparently that is common if you have a broken “motor coupling”. This guide I found online was very helpful. With that in hand, I decided to tear the thing apart. In the worst case, it would have to be replaced, so it was worth a shot. Plus, it would be fun to take it apart.

Apparently, most top loading washers are pretty similar in design. Hers is an Estate TAWX700JQ2. Estate is a cheaper line that is made by Whirlpool. Looking through the guide, I found that the first step is always to loosen the control panel and flip it back. There are a few different ways to open the control panel, but none of them seemed to work. Finally, I found a guide that mentioned removing screws on the back of the machine. I took out four screws per the instructions and everything came loose. It turns out, you only need to remove two, otherwise you’re removing the whole panel from the little hinge things that are supposed to support it. Here’s a picture with the screw that needs to be removed pointed out. It’s kind of at odd angle, facing upwards, but that makes it easy to remove without even pulling the washer out of its spot. There are two of these screws, one on each side.

Image


Once you have the control panel loose, you need to disconnect a wiring harness that plugs into the lower part of the cabinet, then pop out two clips, which appear to be exactly the same as in the guide I linked earlier. Once that is done, you can pull the cabinet off easily. At this point, you can see the whole guts of the machine, and it’s pretty exciting.

Next, you need to get access to the motor coupling, which is a little plastic part that connects the motor to the transmission. The transmission is what drives the spinning of the drum and the agitation. To get at the coupling, you need to remove the pump, which is attached the front of the motor with some clips. This is really easy to remove. Here’s the pump removed, with the motor exposed (the pump is the white thing with hoses attached):

Image

Next, you unplug the wiring harness from the motor (there was only one on this model, contrary to the instructions). You remove some screws from the motor, pop off some clips, and it pops right out. When you remove the motor, you want to be careful because it’s pretty heavy. I put a bunched up towel under it, so it wouldn’t bang up the floor, but getting the clips off required some screwdriver prying, so I remove the towel for better access, and then ended up dropping it on the floor. Oops. With the motor removed, you end up with something looking like this.

ImageHere’s a picture of the transmission, where the motor was attached. In this picture, the coupling is removed, so you can just see the shaft.

Image

From what I’ve seen online, the motor coupling can fail in various ways, but as soon as I pulled out the motor, this one popped out and you could see it was just cracked in half. There are three parts to the coupling, and just the part connected to the motor was broken. I’ve seen stuff where it’s a lot worse.

Image


At this point, I had to stop and get the new part, but I think it probably took less than an hour to get everything taken apart.

The next day, I picked up a part from this place, which had a location in Tempe. It was $14.99+tax, and I didn’t need to give them a model number or anything. Apparently this part is common to all direct drive washers.

As I mentioned before, there are three parts to the coupling. The next day, we removed the rubber ring, and the part that attaches to the transmission (we needed to use a pliers to pull it off), then put all the new parts in. The new parts didn’t mount on the shafts of the transmission or motor very easily, so we had to use a rubber mallet combined with a wooden dowel to pound them in. After the new parts were mounted, it is slightly tricky to line everything up when you put the motor back in, but otherwise everything went very smoothly. After everything was back together, the washer worked again! Hooray!

After this experience, I think the mystery of fixing a washing machine went away, and I wouldn’t be hesitant to attempt more complicated repairs. It’s pretty easy to take apart, and the internals seem pretty simple. Another funny thing to mention is that this was all done without removing or turn off the water supply. I wouldn’t recommend doing it that way, but in this case, the shutoff valves were not working, and it would’ve taken much longer if we had to replace those first.

To recap, here’s what you have to do:

  • Remove two screws from the back of the control panel
  • Flip control panel back
  • Remove wiring harness
  • Pop out two clips holding cabinet
  • Lift off cabinet
  • Remove clips holding pump, and pull pump to the side
  • Remove wiring harness and screws from motor
  • Remove motor clips and pull out motor
  • Remove coupling parts
  • Put new coupling parts in place
  • Line up couplings and put motor in place
  • Replace motor clips
  • Screw in motor clips and attach wiring harness
  • Replace pump and its clips
  • Put cabinet back on
  • Put cabinet clips back in (just push down to snap them in)
  • Attach wiring harness from panel
  • Flip panel down and replace screws

Standing desk

One of the advantages of working from home is that I have complete flexibility in my work area. Over the past year or so, I’ve been experimenting with using a standing setup for part of the time.

To get started with pretty much zero investment, I set something up on top of the bar between my kitchen and living room. The height of the bar was pretty much at elbow height, which is ideal for the keyboard/mouse. I had the awesome mStand from Rain Design, which I’ve used off and on with my main desk, so I set that up on top of the bar, which elevated my laptop screen closer to the optimal height (some info on that here and here). I eventually ended up adding some books under that, so the screen was even higher. Initially, it was hard to stand all day and my legs would get pretty tired. I also noticed that it is critical to wear shoes of some sort while standing for long periods of time, otherwise your feet get sore pretty quickly. I’ve also seen several blog posts that recommend using a pad of some sort to stand on. I haven’t found the need for this, but I imagine it would make standing a bit more comfortable. Pretty quickly, my legs got used to standing all day, and I was able to make it through a day. I still found, however, that on some days/parts of days, for example after running the night before, I wouldn’t want to stand all day. The other disadvantage to this setup was that I had only my laptop display to work with, which isn’t quite as nice as using my external monitor. Here’s what that setup looked like:

Image

After using the setup for a while, I think I like it. I can’t say it’s dramatically improved the way I feel or anything like that, but given how sedentary the life of a programmer is, I think anything that burns more calories and causes you to move around more is good. I think desk workers also have a tendency to hunch over and mess up their posture, and standing up seems like it helps avoid that.

I used the bar-top setup for a year or so, but it’s a pretty ugly thing to have sitting there in my kitchen all the time. I had seen the infamous $22 Ikea standing desk a while ago, but ideally I’d like something that can move up and down, so I don’t have to always stand. I think the GeekDesk would be just about perfect, but I already have a nice desk that I bought a few years ago, and I would hate to get rid of it. So, finally, I bit the bullet and built the $22 Ikea desk, and now I’ve been using it for a couple of weeks. I have the monitor set up on top of the desk, with the mStand below for those times when I need to sit down. Now, when I sit down I just have the small laptop display, which hopefully motivates me to stand more often. If I really want to, it is feasible to move the monitor down below, although it’s a bit of a hassle. Enough talk, here’s what it looks like:Image

So, here are a list of some of the main things I learned in this experience:

  • Don’t expect to stand all of the time. Maybe you will be able to, but it’s nice to be able to sit down from time to time
  • Wear shoes when standing and/or use some sort of mat
  • It’s pretty easy/cheap to experiment with a standing desk, so I would definitely recommend it.
  • Putting the monitor at a height that lets you look straight ahead seems to provide the most comfortable position for the neck.

Static Table Cells in iOS

I have been fiddling with iOS lately, and I was working on a project which used a TableView with static cells.  The project uses Core Data and a Master-Detail View Controller, and when you create such a project in XCode, it populates the project with a bunch of code to do the Core Data interaction, which in my case was completely useless.  As I started to rip it out, my app started crashing with this error:

*** Terminating app due to uncaught exception 'NSUnknownKeyException',
 reason: '[<MasterViewController 0x725ea00> setValue:forUndefinedKey:]: this 
class is not key value coding-compliant for the key staticDataSource.'

After much searching, I found out that this error indicates that something in the NIB/Storyboard has an outlet called “staticDataSource” in the MasterViewController class. I looked through all of the outlets in my storyboard, and found nothing.  I grepped every file in the project for “staticDataSource” and found nothing.  I randomly tried adding a property to MasterViewController called staticDataSource (I made it an NSSet), and the app stopped crashing, but didn’t show my static cells.  Finally, in a random effort, I changed MasterViewController back into a UITableViewController subclass (I had changed it to a UIViewController), and everything worked perfectly.  So apparently, despite what you may read, static table views do in fact need a data source, and making your controller a subclass of UITableViewController automatically provides you with the needed property.

Excellent Mac Apps

There are quite a few apps I use regularly that I find really useful.  Here’s a list:

  • 1password – this one is huge.  It’s expensive, but worth it.  It keeps track of all of your passwords and allows you to stop using the same password on a bunch of web sites.
  • Adium – obvious, but worth mentioning
  • Dropbox
  • Evernote – free and great for keeping track of notes from meetings, etc.  Also an iPhone app with very good sync functionality
  • Meerkat – SSH tunneling.  Works great, but is a bit pricey.
  • Mental Case – great flash card app with iPhone support.  The syncing is a little clunky, though.
  • Reeder – RSS reader
  • Wunderlist – To do lists.  Also an iPhone app, but the syncing seems a little buggy right now.
  • DBVisualizer – Database client.  Works on pretty much every database.
Anyway, I would recommend all of the apps in this list.  They are all critical to my productivity.  The ones that are not free are worth the money, in my opinion.

How to trust a certificate in Java on Mac OS X

Yesterday, Apple released an update to Java for OS X.  I had trusted a self-signed cert with my old java installation, and it stopped working with the update, so I had to figure out how to add it again.  It’s not very hard, but kind of tricky to figure out, so here you have it.

First, export the cert using a web browser or whatever.  I used firefox, because it is easy, and I couldn’t figure out how to do it in chrome.  You should end up with a simple PEM encoded file.  Then here’s how you import it:

$ cd /System/Library/Java/Support/CoreDeploy.bundle/Contents/Home/lib/security
$ sudo cp cacerts cacerts.orig
$ sudo keytool -importcert -file your_cert_file_here -keystore cacerts

you’ll be prompted to trust it, then you are done.

Update:
In recent versions of OS X (at least 10.9 and 10.10), you can use this command to find your Java home:

$ /usr/libexec/java_home

…then, the cacerts file is located under there, in jre/lib/security.

Also, as Evan T pointed out in the comments, the password is “changeit”. This is pretty much universal for all JVMs I’ve used (including Linux/Windows).

And one more thing. It’s a good idea to specify a -alias parameter when adding the certificate, otherwise it gets added under the alias “mykey”, then if you try to add another one, you get an error, since it’s trying to add another “mykey”.